


Maptive‘s Auto Territory Builder has a step where you pick the numbers you want your territories balanced on. The list shows columns from your spreadsheet, labeled “Data Metrics”, along with “Demographic Census Data”. So Maptive can balance territories on one number or on several at once, and each number you pick gets its own importance setting.
After that step, the builder asks how many territories you want and gives you three options that change how they’re drawn. You get back a first draft with a graph showing how each number is spread across the territories, and you still finish that draft by hand.
Which Metrics Can Maptive Balance Territories On
The variables come from two places. “Data Metrics” are columns in the spreadsheet you uploaded, such as sales, account potential or visit hours. “Demographic Census Data” shows up when Maptive has Census data for the boundary set you’re building from. It has that data for the United States and Canada.
Columns the builder can use have a checkbox next to them. Select at least one variable. The current builder accepts up to three creation variables, each with its own importance setting.
Maptive doesn’t calculate workload for you. If you want territories balanced on visit hours or required calls, you need a column for that in your file.
Before any of this, you pick the boundary set the territories are built from. US Zip Codes is one of the sets, and you can limit the build to one part of a country.
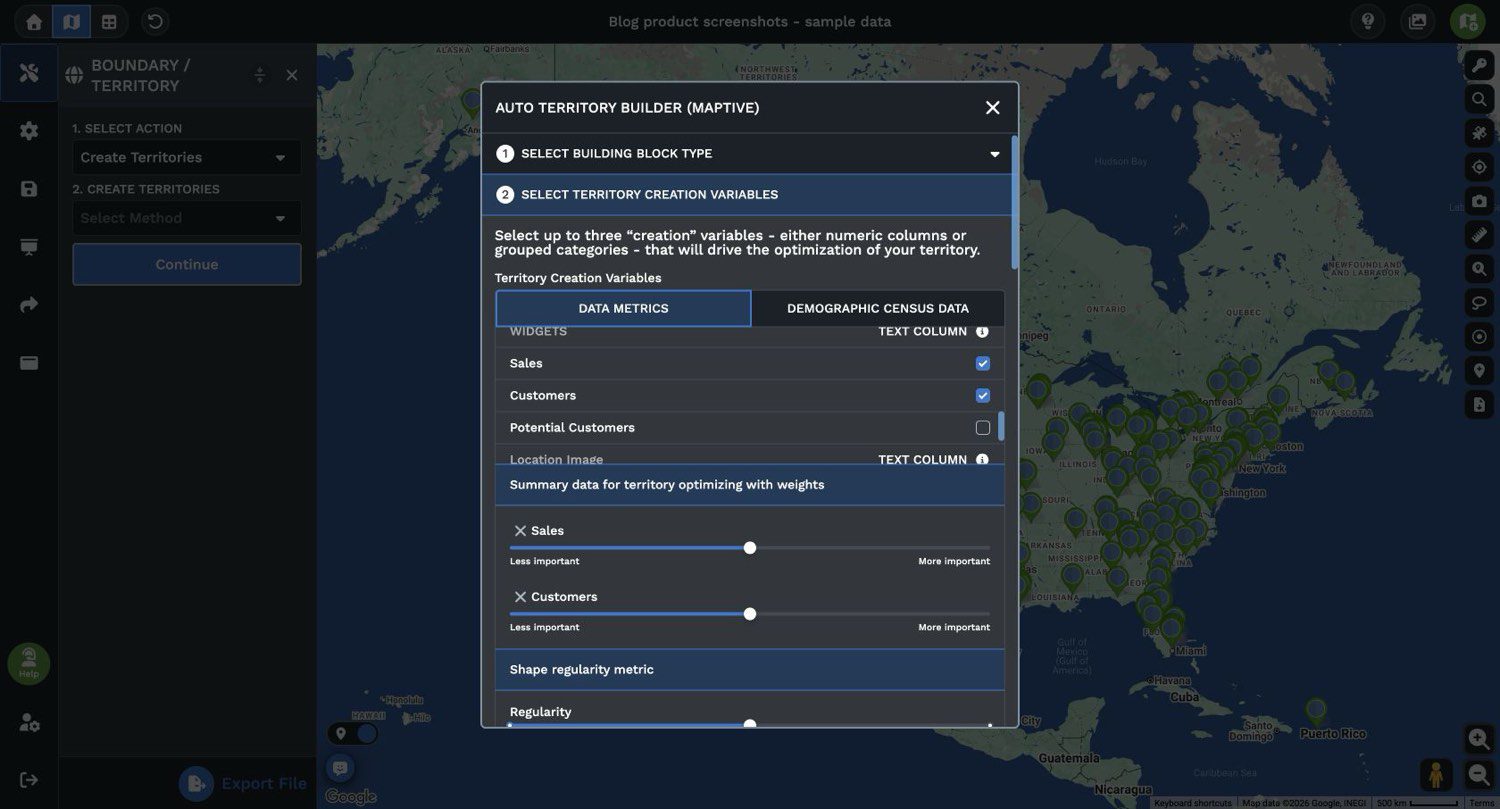
Importance Weighting for Multiple Variables
When you pick more than one variable, each one gets an importance level. Give two variables the same importance and Maptive weights them equally. You could make total sales the most important variable, for example, and general population a secondary factor.
Which variable should weigh more depends on what uses up a rep’s time. If your reps mostly look after current customers, existing revenue should count for more. If they mostly go after new business, it’s the potential they haven’t won yet, and if they’re in the field with long drives, it’s travel. No single split is right for every team.
Revenue and account count often rise and fall together, so using both counts the same thing twice. It’s also easier to tell which number is off when you’ve only picked a few variables.
The Three Build Options
After the variables, the builder asks how many territories you want. Most of the time, that number is all you set here. The same screen has three options, “Respect Sales Rep Locations”, “Respect Previous Territories” and “Optimize with Constraints”.
Respect Sales Rep Locations
This option needs a separate map with only your sales rep locations on it. You choose that map in the builder, then pick a column from it to use as the territory name. The number of territories changes automatically to match the number of reps you have.
The builder then tries to put each rep as close to the center of a territory as it can. It can’t always do that and balance the metrics you chose, so it does its best for both. A rep can end up off-center when balancing the numbers pulls a boundary the other way.
This is one way to take travel into account, since a rep near the middle of a territory is closer to all of it.
Respect Previous Territories
Normally the builder starts from nothing. With this option you select your existing territories as the starting point, and the builder rebalances them. Maptive doesn’t say how closely the new lines keep to the old ones, so compare the result with your current map before you tell anyone about a change. Look at which ZIP codes or counties moved and which accounts are in them.
Optimize with Constraints
A constraint keeps a variable, like total sales or number of customers, inside a range that’s acceptable for your business. You check the box next to “Optimize with Constraints”, then type the low and high values or drag a slider.
In Maptive’s example, sales are kept between 30 million and 40 million per territory. A range like that decides how many territories you get. Using total US sales, the build came back with 38 territories averaging about 35 million each.
Constraints Apply Only to the Variables You Selected
You can only add a constraint on a column you’re already using as a creation variable. If the column you want isn’t listed, go back to the “Select Territory Creation Variables” step and add it there. That means a number you want capped also has to be a number you balance on, and it needs an importance level of its own.
Build Steps, Run Time and the Distribution Graph
- Open Map Tools, click Territories, select “Create Territories”, then “Auto Territory Builder”, and click “Continue”.
- Pick the boundary set and the area to cover.
- Pick the variables and set their importance.
- Enter the number of territories, or set one of the three options.
- Name the territory group and click “Generate Territory”.
A status bar shows progress. A run takes 1 to 15 minutes, depending on how much data you have and how large an area you’re covering.
When the run finishes, the territory boundaries are added to the map. A graph below the map shows how each metric you chose is spread across the territories. Clicking a territory shows its metrics, and you can add more from your columns through Customize Metrics.
Can Every Metric Come Out Equal
No. When Maptive ran a build with sales weighted heavily and population used only as a secondary factor, the sales totals came out within about 10% of each other. That 10% comes from one example, so don’t take it as something Maptive promises.
A territory with more large accounts has more potential for each hour of work, so potential and workload can’t both be level across the map.
Pick the one variable that has to come out tight and give it the highest importance. Then read the graph to see how far apart the others came out. Look at the accounts behind the totals too. Two territories with the same total can mean different work, one with a few large accounts and the other with hundreds of small ones.
The Builder Does Not Balance on Drive Time or Compare Versions
The builder doesn’t balance on drive time. Its variables are your spreadsheet columns and Census data.
You can bring travel in with Respect Sales Rep Locations, or with a travel-hours or visit-hours column in your file, which you select like any other variable.
The builder doesn’t compare builds for you. To compare two, run it a second time or copy the map and change the copy.
Editing Auto-Built Territories by Hand
For a long time, people have done this by starting from an automated first draft and having the managers who know the area review and change it. Maptive lets you edit a territory by Drag and Drop, Drawing or Selection.
For territories built from ZIP codes or counties, use “Advanced Edit”. You select or draw an area there, then add it to a territory, remove it or reassign it.
Mostly you’ll be moving whole ZIP codes or counties from one territory to its neighbor. After each move, click the territory and read its totals.