Route Planner & Route Optimizer
A list of stops on your map turns into a driveable sequence in the Routing and Directions tool, with multiple stops, drag-to-reorder, plus a 1-click optimize pass per route.
Routes Ordered for Shortest Driving
Multiple Stops: Build a single route across many different locations on your map, far past anything a consumer mapping app can hold for a multi-stop driving plan.
Optimize Route Button: Click once and the tool returns the most efficient route between stops, with the first and last locations held in place and the middle resequenced.
Drag-Handle Reorder: Grab the stacked = symbols next to any stop and drop it into a new slot on the list, with start, end, and middle stops all open to manual reorder.
Add Another Directions Instance: Run multiple sets of directions on 1 map, each in its own color, so an original route and the optimized version can sit beside each other.
Lasso & Fill Locations: Outline a cluster of pins with the Lasso, then send the whole selection into the routing panel in 1 action rather than adding any marker by hand.
Edit Route Settings: Open the Settings icon, click Edit Route, then change the route name or its color and click Save so each plan on the map carries its own identity.
Optimize a Route in 3 Steps
1
Add
Open the marker info panel, click the tools icon, hit Add to Route, and the stop loads into the panel as starting point.
2
Stack
Click Add Additional Location to load every other stop, or grab a cluster with Lasso & Fill Locations to fill the panel.
3
Optimize
Click Optimize Route and the most efficient driving sequence loads, with the first and last stops held in their slots.
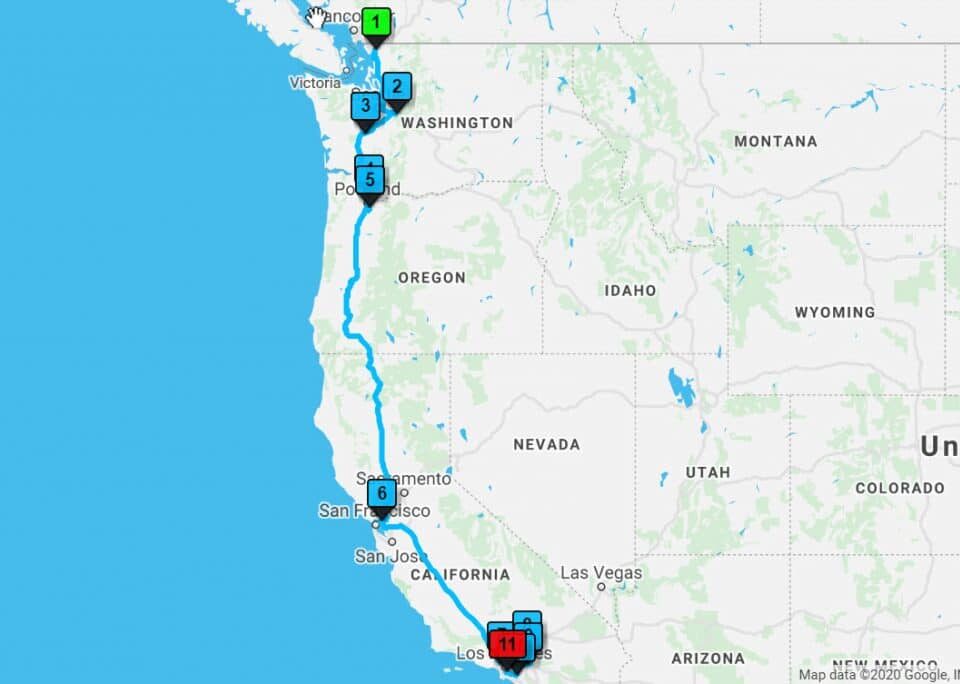
Long Multi-Stop Routes
Original vs Optimized View
Manual Stop Tweaks
Subset Routes by Lasso
Multi-Route Map Readability
Anchored Start and End
Route Planning From Map to Phone
How Optimize Route Works
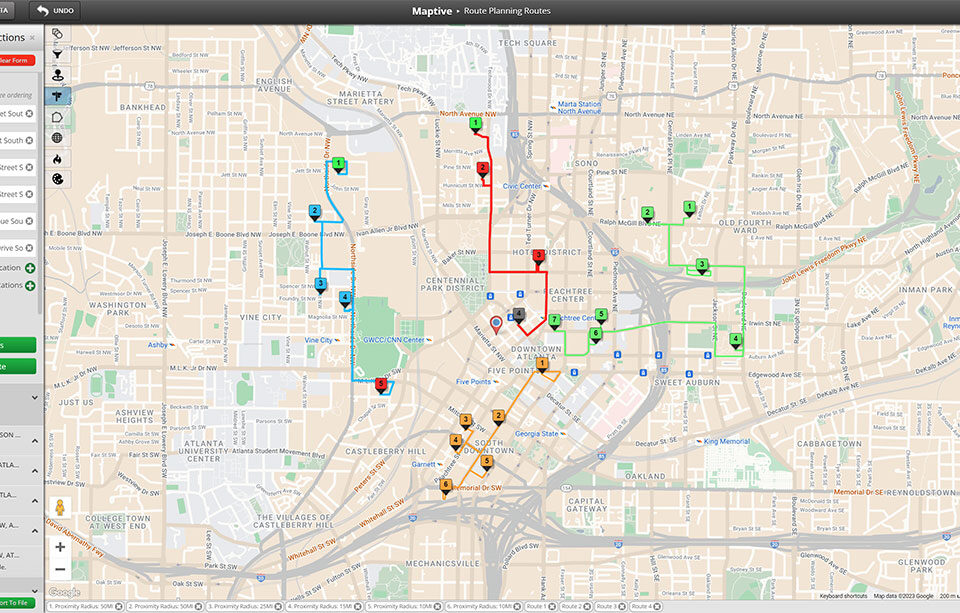
Open the Route Planner and Route Optimizer panel from the left side of your map and the workflow is the same every time. Click any pin on your map, click the tools icon for that marker, then pick Add to Route. The Route Planner and Route Optimizer panel opens with the first pin loaded as starting point. From there you keep clicking pins and adding them through the same tools icon, or you click Add Additional Location inside the panel to type or paste another stop into the list.
Click Get Directions and the route draws on your map in the color you picked, with details available below the panel through a drop-down option. The route runs in the order the panel currently shows, which is the order you added the stops. That order is fine for a quick directions pass on 2 or 3 locations, and rarely the most efficient sequence once the list grows past a handful of pins.
Click Optimize Route and the tool returns the most efficient route between your stops. The first and last locations stay the same, and only the middle of the list resequences for shorter total driving. If the new order does not fit the day, grab the stacked = symbols next to any stop and drop it into a different slot to override the algorithm by hand.
Multiple Routes Per Map
A single map often needs more than 1 route drawn on the same canvas. The original sequence next to the optimized version, a planning route next to a backup option, or a set of routes that each cover their own portion of the same pin pool. The Route Planner and Route Optimizer panel handles those cases through Add another directions instance, which opens a fresh routing instance on top of the route already drawn.
Run a route the standard way first. Pick your stops through the tools icon or Lasso & Fill Locations, click Get Directions, click Optimize Route, then click Add another directions instance in the dialog. A second routing panel opens for input, and you load the next set of stops the same way. The 2 routes draw together, each in its own color, and the map carries both in parallel for compare or hand-off to the team.
The Maptive article notes that you can add as many routes as you need on a single map. Each route carries a name and a color of its own, set through the Settings icon and Edit Route, then saved with the Save button. The map turns into a multi-route plan rather than a single sequence, and the routes underneath stay drawn as new ones go on top of the same base layer for the team.
Building the Stop List
Most teams start with a stop list already in a spreadsheet, and the routing pass is what turns that flat list into a sequence the driver can follow on the road. The Route Planner and Route Optimizer fits this flow without forcing a re-import. Drop your spreadsheet into Maptive once, the locations show up as pins, and any pin on the map is now eligible for a routing pass through its marker info panel and tools icon.
Adding a long list of stops 1 by 1 through the tools icon is fine for a short route, and a faster path exists for clusters. Pick the Lasso icon, click points around the area on your map, then close the polygon by clicking the start point or double-clicking. A popup appears with several options across the marker pool inside, and Lasso & Fill Locations sends every pin in the polygon straight into the routing panel as stops.
The same panel supports multiple locations on a single route, far past the cap a consumer mapping app holds for a multi-stop driving plan. Once the panel is loaded you can use Add Additional Location to type a single pin that does not live in your dataset, or click Clear Form on the top of the panel to reset and start a fresh routing pass from a clean state.
FAQs
What is the Route Planner and Route Optimizer in Maptive?
The Route Planner and Route Optimizer is a panel on the left side of your map that builds a driving route across your pins. You add a stop by clicking a pin on the map, clicking the tools icon, then picking Add to Route. Stops also enter the panel through Add Additional Location for typed inputs, or through Lasso & Fill Locations for a polygon pick across a cluster. Click Get Directions to render the route, then click Optimize Route for the most efficient sequence between your locations.
How many stops can I add to 1 route?
A single route in the Route Planner and Route Optimizer supports multiple locations on your map within 1 plan. The first stop becomes your starting point, and you can drag any stop with the stacked = symbols to set the order before or after a routing pass. Click Optimize Route and the tool returns the most efficient route between every stop, with the first and last locations held in place. The cap covers most multi-stop driving days for a single driver on a route.
How do I optimize the order of stops?
Click Optimize Route inside the Route Planner and Route Optimizer panel after you load your stops. The tool returns the most efficient route between your selected locations and keeps the first and last stops the same. Only the middle of the list resequences. If you need to override the algorithm on a specific stop, grab the stacked = symbols next to that stop and drop it into a different slot, and the route on the map redraws against the new order without a full rebuild.
Can I run more than 1 route on the same map?
Yes. The Route Planner and Route Optimizer supports multiple sets of directions on the same map without forcing a switch. Run your first route through the standard flow, then click Add another directions instance in the dialog to open a fresh panel. Load the next set of stops the same way through the tools icon or Lasso & Fill Locations. Each route draws in its own color, and the article notes you can add as many routes as you need on a single map.
How do I rename or recolor a route?
Open the Settings icon next to the route and click Edit Route on the panel that appears. The panel lets you change the route name and pick a different route color from the available color options. Click Save to apply the update. The new color and name show up on the map and inside the routing panel for that route instance, which makes a multi-route map easier to scan when several plans share the same base layer across the team.
How do I add a cluster of stops in bulk?
Use the Lasso. Click the Lasso icon on the right side of your map, click points around the area on your map, then close the polygon by clicking the start point or by double-clicking. A popup opens with options against the markers inside. Pick Lasso & Fill Locations and every pin in the polygon flows into the Route Planner and Route Optimizer panel as stops. Click Optimize Route afterward and the tool returns the most efficient sequence across the lassoed subset, with first and last stops held in place.
Does the tool keep my starting point fixed?
Yes. When you click Optimize Route, the tool keeps the first and last locations the same and only resequences the middle of the stop list. The first stop you add becomes the starting point of the route in the panel, and the final stop on the list becomes the end point. If you need a different anchor, grab the stacked = symbols next to any stop and drop the chosen pin into the first or last slot before you click Optimize Route.
How do I reset the panel and start over?
Click Clear Form on the top of the Route Planner and Route Optimizer panel and the panel resets for a fresh routing pass. Every stop you added drops from the panel, and the route line drawn on the map for that instance is wiped along with the input fields. From there you can begin a new route by clicking a pin on the map, clicking the tools icon, picking Add to Route, and the panel opens with the new pin loaded as the first stop.
Can I edit a route after it is built?
Yes. Drag-and-drop reorder is supported on the start, end, and middle stops through the stacked = symbols next to each row in the panel. Add a missed pin through the tools icon on its marker info panel, or through Add Additional Location inside the panel. Open the Settings icon and click Edit Route to rename the route or pick a different color, then click Save. The route on the map updates against any of those changes without a full rebuild.
How is this different from a consumer mapping app?
Most consumer mapping apps cap a multi-stop route at around 10 locations and rebuild the entire sequence on every change. The Route Planner and Route Optimizer in Maptive holds multiple locations on a single route, supports multiple route instances on the same map through Add another directions instance, holds the first and last stops on Optimize Route, and lets you drag-and-drop the order or change the route name and color through the Settings icon for any plan on the map.